

A Guide to generate Mochawesome report for automated tests


Introduction
Automated testing has become an integral part of the development and deployment process nowadays, as product features are shipped to market faster than ever before. With the increase in focus on automated tests, it's equally important that we represent the reports of automation runs in the most reliable and readable format so that it is easy for any stakeholders or teams to understand the underlying issue in the system quickly and act upon it instead of finding the problems elsewhere. Hence, the right report and logs play an important role in any testing life cycle. In this article, we will explore one of such reporting tools called Mochawesome in the javascript Mocha framework which is quite popular, easy to use, and can be represented in a simple yet elegant manner. But, before we jump into our reporter let's first understand what is Mocha test framework is all about.
Introduction to Mocha
Mocha is the modern-day javascript test framework that executes on nodeJs, used for writing unit tests and end-to-end automated tests for API, Web UI, Performance test, etc. Popular javascript frameworks like cypress, selenium-webdriver, webdriverIO all have supported mocha as their core style of writing tests. Mocha thus, has wide acceptance in the javascript community because of its simple and rich features it provides while writing from simple to complex test cases. Let's look into its basic building blocks and other high-level features that help us to write neat and clean test cases.
Installation:
To Install Mocha first we need to install Node.js in our local machine. Once NodeJs is installed, follow the below steps to get started with Mocha.
- Step 1: Create a folder under your workspace, for example, MochaTest
- Step 2: Open terminal at the folder level and initialize npm using
npm init -y.This command will create a package.json file under the MochaTest folder with default values as shown in the image below: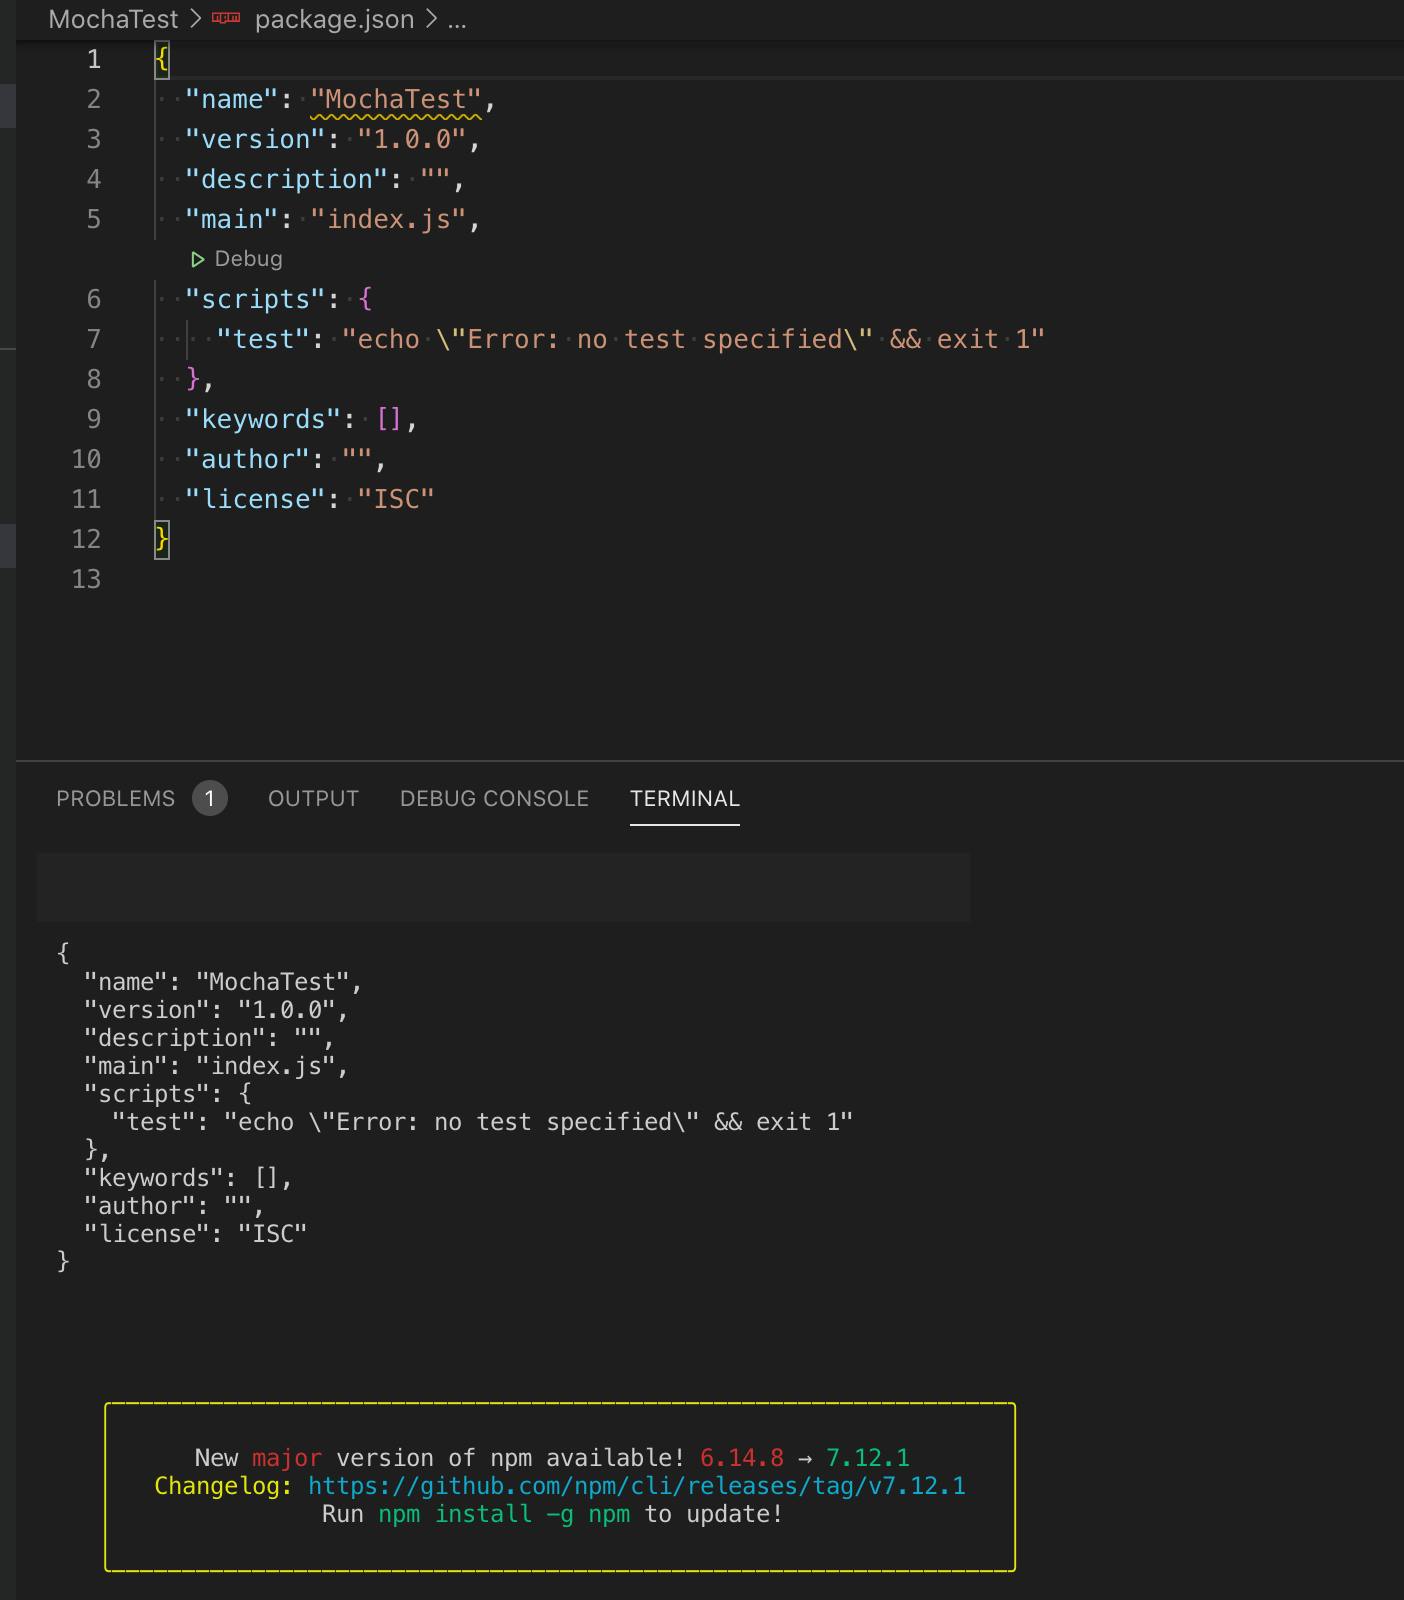
- Step 3: Now, you can install Mocha with npm package using
npm install mocha --save-dev  //available under a specific directory MochaTest
OR
npm install -g mocha // available for global workspace use
Running your first test in mocha
As we have installed mocha under our workspace now it's time to work with its features, for a simple walkthrough let's create a test file search.js under MochaTest and write few lines of code to see how mocha works.
const assert = require('assert')
describe('Mocha Works?', () => {
    it('Mocha Run test', () => {
        assert.ok(true, 'Failed test')
    });
    it('Should return -1 if value not present', ()=>{
        assert.strictEqual([1,2,3].indexOf(5), 'Failed to find')
    });
})
In the above code snippet,
describe('title', function(){...})acts as the basic building block of mocha which is equivalent to defining a test suite under which we can define multiple test cases using it() block. The first parameter in describe() provides a high-level description for the test suite and its objective.it('title description', function(){...})block acts as a test case under each test suite and there can be as many test cases as one could write under describe() block using it(). both the block accepts first parameters as the description part.- In the test case above, we are just using assert() functions to pass or fail test cases, but it can be very complex code and assertions at multiple levels depending upon the type of tests.
Run the above file using:
npx mocha --spec search.js , where --spec is a way to specify the test file to run using mocha.
Output:
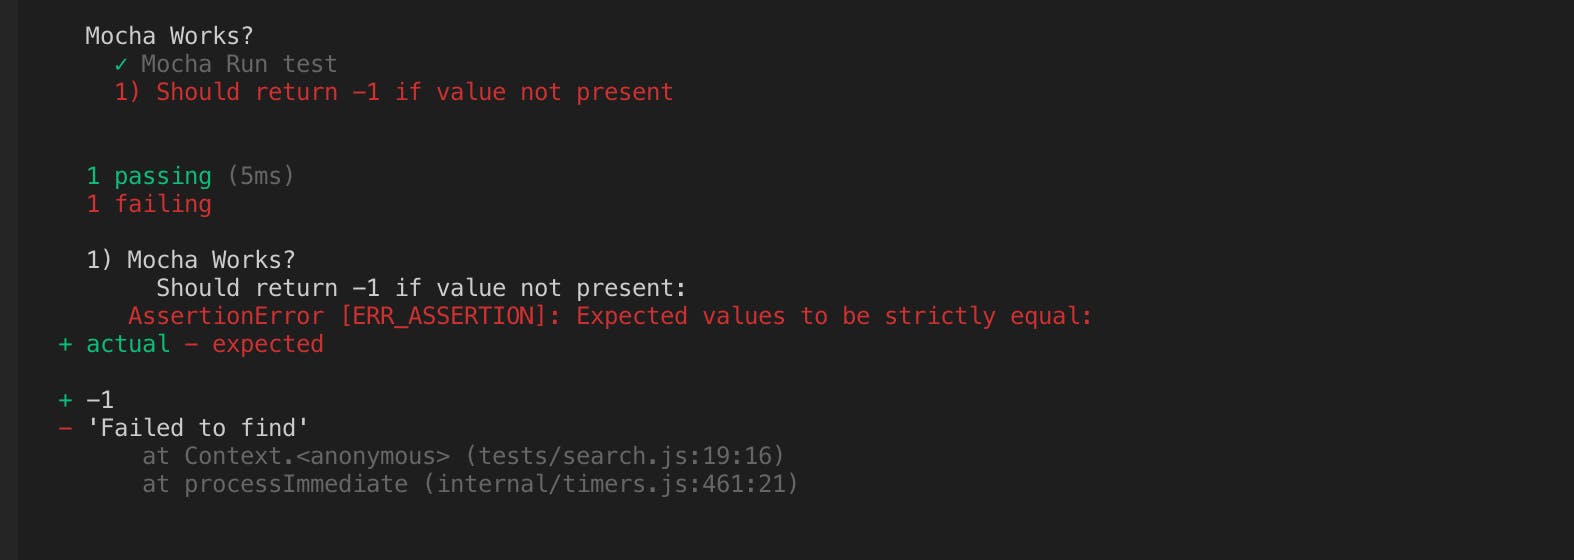
As you can see in the above screenshot is the default output you get on the terminal when mocha tests are executed. Likewise, Mocha comes with many reporters options like:
- Spec [Default]
- DOT Matrix
- Nyan
- List
- Progress
While these reports are displayed on the terminal window, they might not give you a whole lot of details that one would look for or share with large sets of test cases that are complex in nature. Ideally, Reports are expected to visualize the test details, failures, screenshots, time for execution, extra content for tests in case you want to log more details, and so on...
Mochawesome is one such reporting option available with the mocha style of tests that generates standalone HTML/CSS test results to visualize your tests in a simple and detailed way. Mochawesome is supported in all the leading test frameworks that support the mocha style of writing tests. Let's look at some of the highlights of mochawesome reports which is truly amazing.
Features of Mochawesome report
- Mochawesome reports are designed in a simple and mobile-friendly way and it uses chartJS to visualize the test reports.
- It has supports for displaying all the different types of hooks -
before(), beforeEach(), after(),afterAll()and so on .. - Mochawesome provides inline code review so that failure at a particular line of code is directly visible in the report itself.
- It has support for stack trace logs and failure messages.
- You can even add extra context information to tests like console logs, environment details, custom messages to tests as an attachment. This gives the extra hand of information about the test cases in the report.
- Since the reports are generated with standalone HTML/CSS, they can be shared as an offline report with .HTML extension.
Adding Mochawesome modules
Mochawesome can be added to your project folder using npm install mochawesome mochawesome-report-generator --save-dev.
Note: mochawesome-report-generator works in conjunction with mochawesome to support additional reporter options and advance usages for merging multiple JSON files into a single HTML report. It can be skipped if your need is to just generate an HTML report without extra options being used.
Generating Mochawesome Report
To generate a report with mochawesome run the tests using, npx mocha --spec search.js --reporter mochawesome.
- option spec is for file path where test file resides
- option
reporteris used to specify the report option we want to generate, default is spec reporter in mocha as covered earlier.
The above command will run the single test file search.js and generate reports under folder mochawesome-report which gets created at the root level of your project.
Report folder structure would look like this:
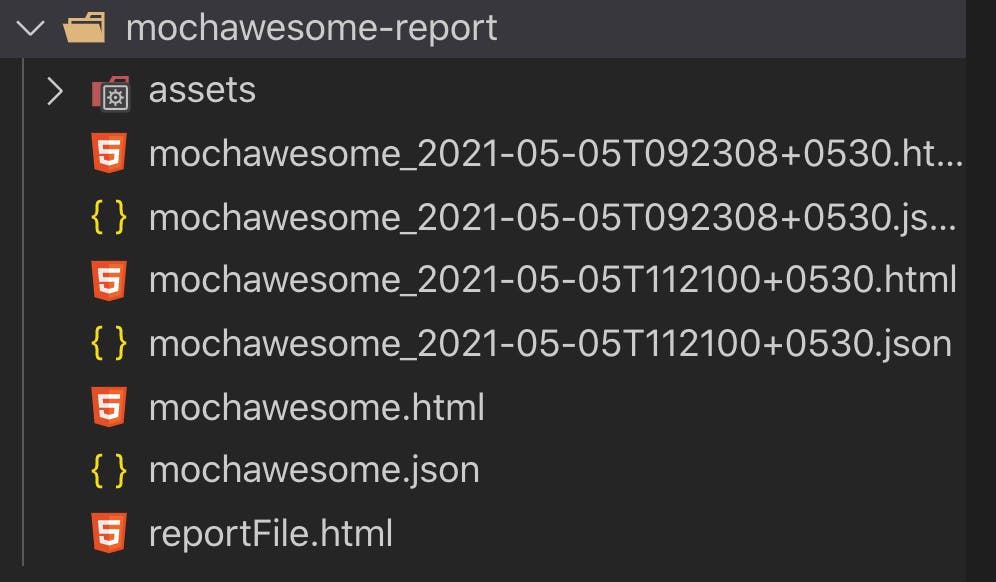
- mochawesome.html is the file where your test results would be rendered.
- mochawesome.json file is the raw output of the results of the test which is used for rendering in HTML format
You can also manage tests run in package.json scripts as shown below:
"scripts": {
    "test": "mocha --spec ./tests/search.js --reporter mochawesome --parallel"
  },
and now you can execute the test using npm command: npm test
You can also run multiple tests under a folder by replacing ./tests/test.js with ./tests/*.js in the above scripts and tests will be executed in parallel mode with
--paralleloption added.
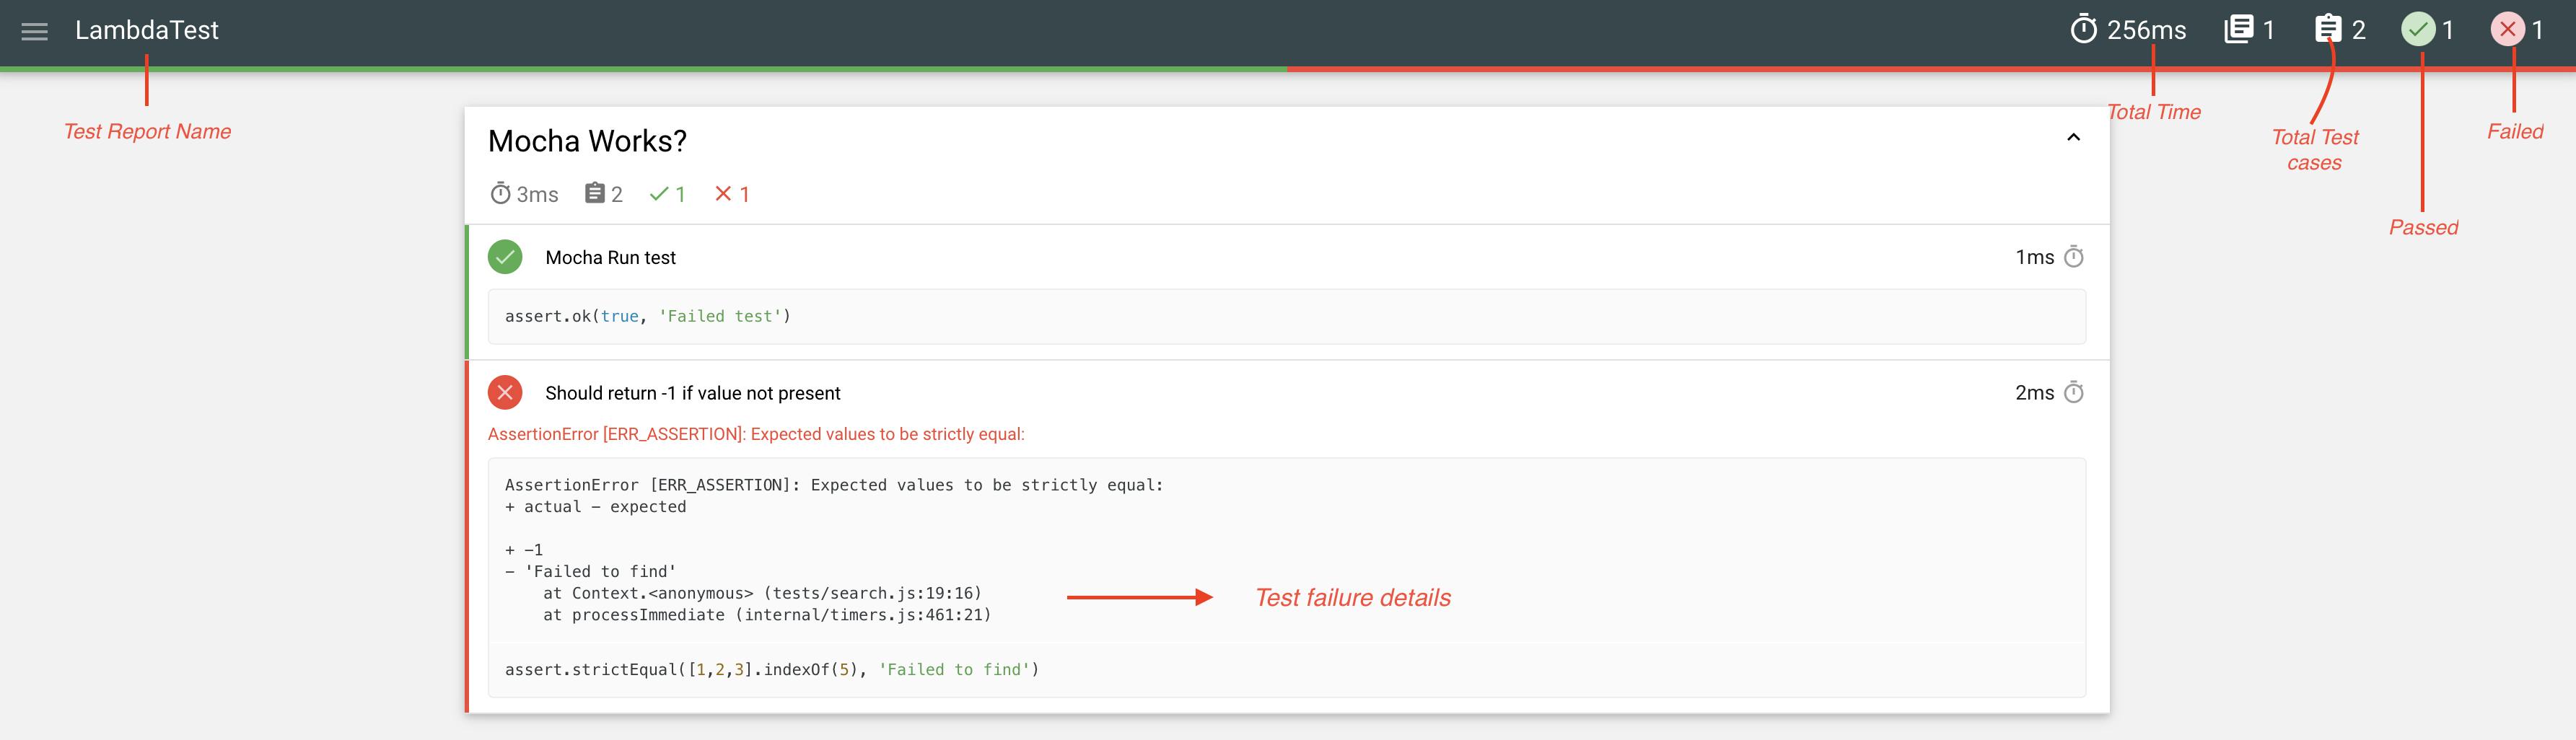
Report output in browser:
If you want to generate reports under custom folder with the custom filename you can do that by passing --reporter-options in script command like this:
 scripts: {
"test" : "mocha --timeout 30000 ./tests/*.js --reporter mochawesome --reporter-options reportDir=myReport,reportFilename=reportFile"
}
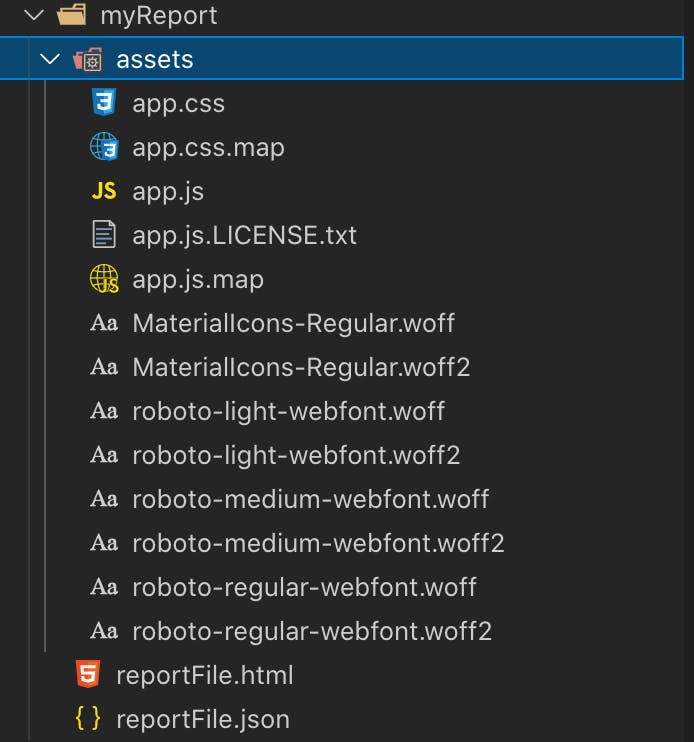
In the above command, reportDir specifies the folder name, and reportFilename is the name of the report file (HTML file) you would like to have.
Below the screenshot of the folder structure that is created after running the above command:
Other reporter options
Mochawesome-report-generator provides other advance reporter-options that works with CLI as well as through the .mocharc.js file which can be configured to overwrite default reporter settings. Options that are useful while generating reports:
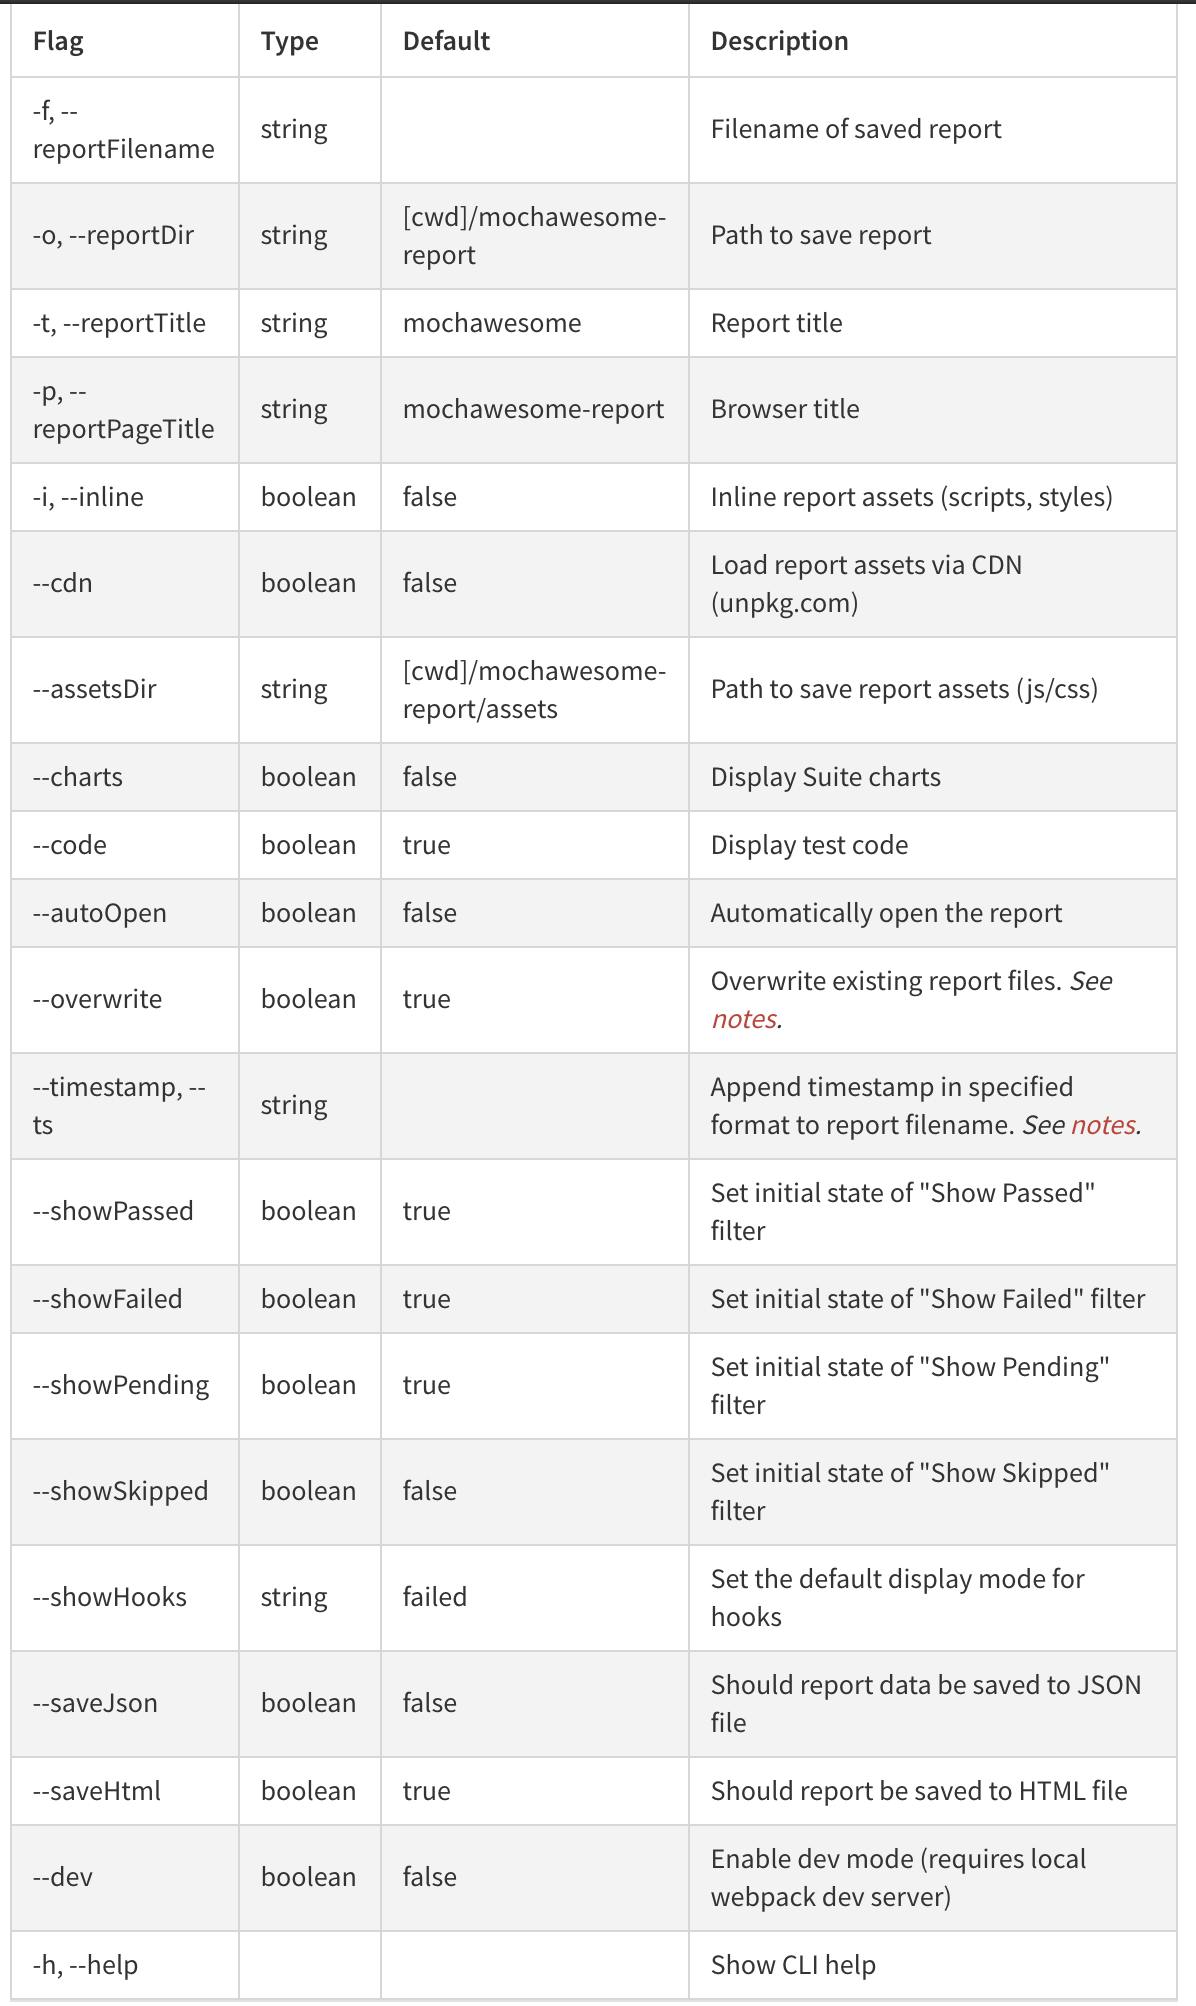 credit: npmjs.com/package/mochawesome-report-genera..
Sample file for configuring options in the report
.mocharc.js file
module.exports = {
    reporter: 'node_modules/mochawesome',
    'reporter-option': [
        'overwrite=true',
        'reportTitle=My\ Custom\ Title',
        'showPassed=false',
        'timestamp=true',
        'code=false'
    ],
};
Adding context to the report
Additionally, one may require to add extra information to the report such as detailed logs, screenshots on failure, etc which we discussed as one of the highlights of the mochawesome report.
Mochawesome has the addContext() helper method with which its possible to add the additional information in the report.
addContext() works with ES5 style of function and not with arrow style.
So, let's modify the above code to add some additional lines to it and understand how addContext() works. We will do the following updates:
- Use selenium-webdriver js to launch browser in LambdaTest
- Intentionally fail the test cases using assert
- On failure capture screenshot and add it in the report using addContext() method.
- Check the report with a screenshot
search.js code modified:
const { Builder } = require('selenium-webdriver');
const assert = require('assert')
require('selenium-webdriver')
require('chromedriver')
const fs=require('fs')
const addContext=require('mochawesome/addContext')  // This is required when using addContext()
require('dotenv').config()
const conf = require('../conf/conf').config
describe('Mocha Works?', async () => {
    let driver;
    it('Open Google',async ()=>{
        let caps = conf.capabilities;
        driver= await new Builder().usingServer(process.env.GRID_HOST).forBrowser('chrome').withCapabilities(caps).build();
        await driver.get('https://www.google.com');
        assert.ok(false,'Assert Failed!')
    })

    it('Mocha Run test', function () {
        assert.ok(true, 'Failed test')
        addContext(this,'Inside test some info...')

    })
    it('Should return -1 if value not present', function (){
        assert.strictEqual([1,2,3].indexOf(5), -1);
        addContext(this,'Another level of info..')
    })

    afterEach(async function(){
        let filename;
        if (this.currentTest.isFailed()) {
            var data= await driver.takeScreenshot();
            var base64Data = data.replace(/^data:image\/png;base64,/, "");
            var date = new Date().toISOString();
            filename = 'out' + date + '.png'; //create file name with timestamp attached
            fs.writeFileSync(`myReport/${filename}`, base64Data, 'base64', function (err) {
                    if (err) console.log(err);
            });
            console.log(filename)  //log to terminal
            addContext(this, '../myReport/' + filename) //adding to report
        }
    })
    after(()=>{driver.quit()})

})
create config file conf.js to define capabilities of browser in lambdaTest:
require('dotenv').config()
exports.config = {
    LT_user: process.env.LT_user,
    LT_pass:process.env.LT_token,
    capabilities: {
        'build': 'Mocha-Selenium-Sample', //Build name
        'name': 'Test sample for Mochawesome', // Test name
        'platform': 'Windows 10', // OS name
        'browserName': 'chrome', // Browser name
        'version': 'latest', // Browser version
        'visual': false,  // To take step by step screenshot
        'network': false,  // To capture network Logs
        'console': true, // To capture console logs.
        'tunnel': false // If you want to run the localhost then change it to true
    }
}
Execute test using npm test OR npx mocha --spec ./tests/search.js
Sample Output for Report & LambdaTest dashboard:
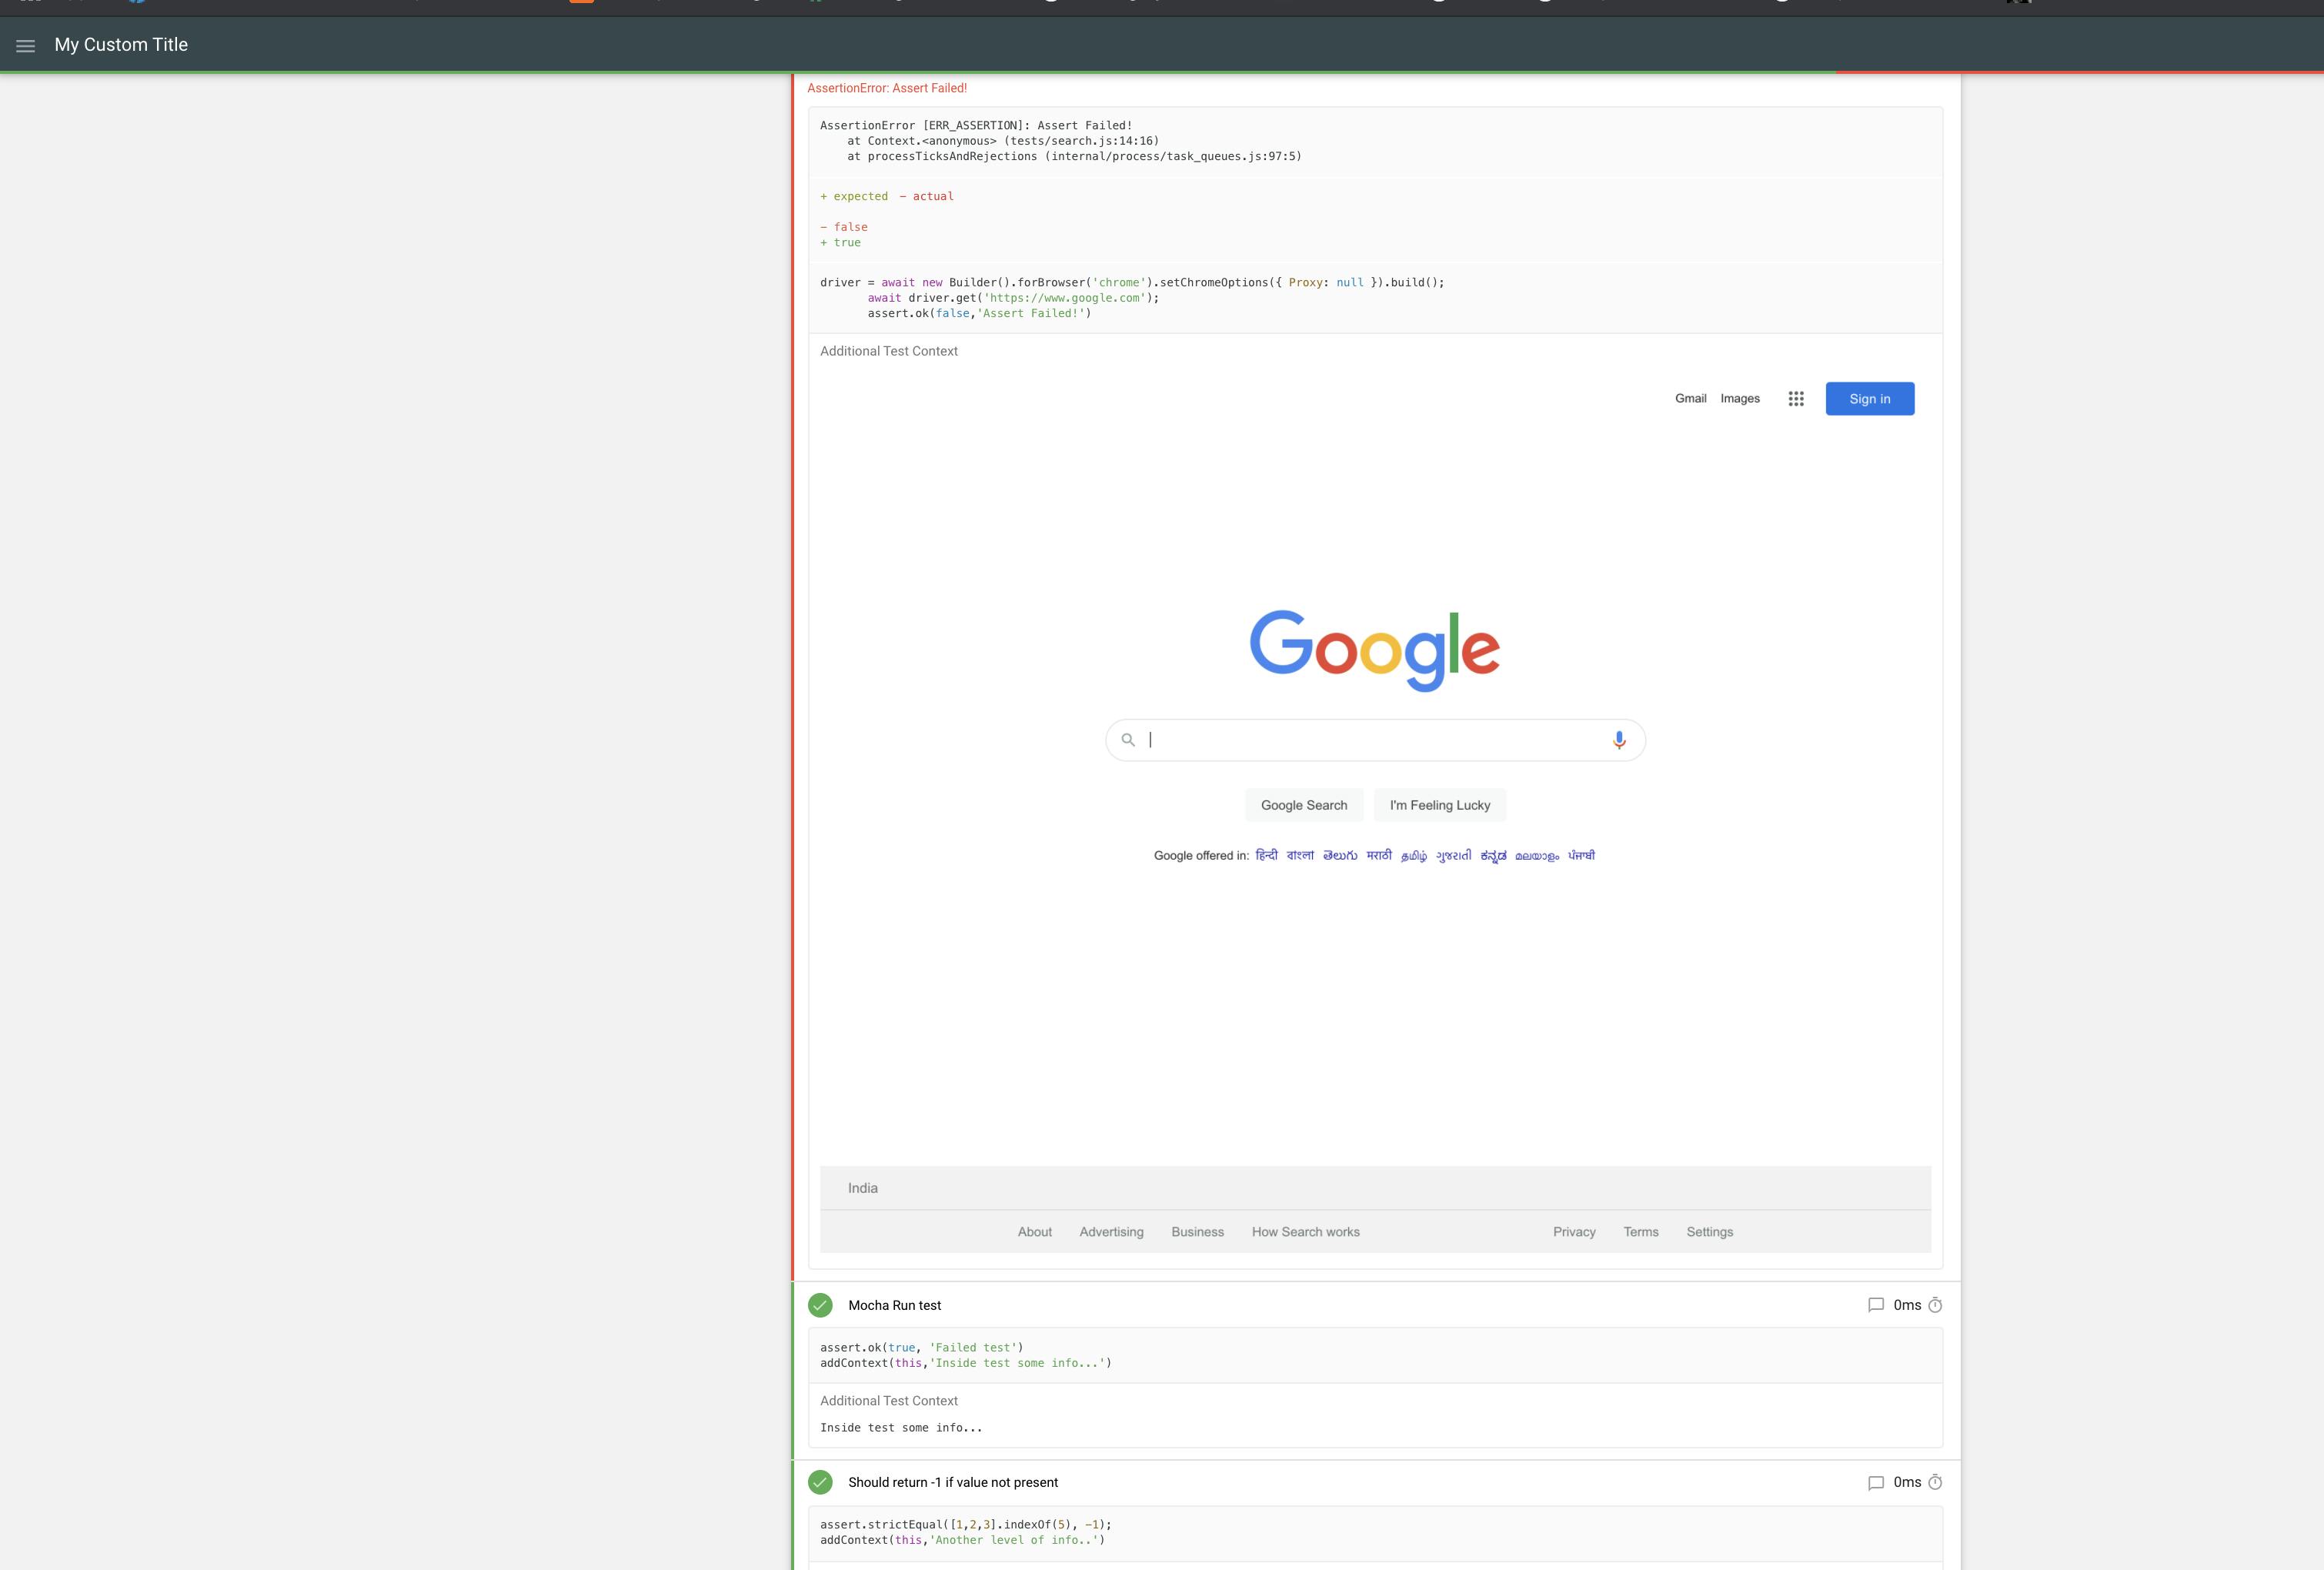

In the end, to summarize the post we first understood the basics of the Mocha framework and how it's easy to write BDD style tests using it. Then we eventually saw the various ways to generate reports and how mochawesome really helps us to present a better reporting format combined with mochawesome-report-generator. We also covered ways to leverage reporter-options and add additional details to the report using the addContext() helper method. Lastly, we saw the full report with details attached in the report and running our tests in cloud-based hub LambdaTest. I hope this will help readers to implement mochawesome report in their project or learn new things in the wonderful land of technology. Happy Learning!